Tutorial Arduino – Multiple LEDs
Ide Dasar
Kalau pada tutorial sebelumnya kita sudah bisa membuat 1 buah LED berkelap-kelip, maka pada tutorial kali ini kita akan menggunakan banyak LED. Kita akan menggunakan 8 buah LED. Tutorial kali ini akan memberikan kesempatan pada anda untuk ber-eksperimen menulis kode pemrograman untuk Arduino. Catatan: Tutorial dan kode yang digunakan di sini disadur dari kode yang tercantum pada link berikut: http://ardx.org/CODE02
Sejalan dengan pengaturan LED kita akan mencoba untuk membuat kode pemrograman lebih sederhana dengan beberapa metode.
for () loops – digunakan ketika kita ingin menjalankan sejumlah baris kode berulang-ulang.
arrays[] – digunakan untuk mengatur penggunaan variabel dengan lebih mudah (array = grup dari variabel).
Rangkaian
Komponen yang diperlukan:
- 8 buah LED
- 8 buah resistor 330 ohm
- Kabel jumper
Skema rangkaian dapat dilihat pada gambar berikut:
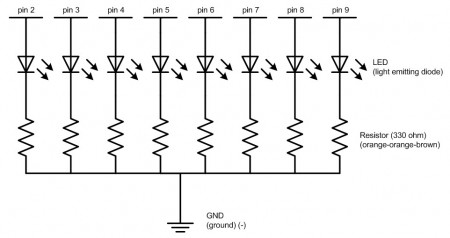
Skema rangkaian untuk banyak LED
Berikut ini adalah gambar simulasi penempatan komponen pada breadboard dan board Arduino. Gambar simulasi ini menggunakan software Fritzing yang bisa didapat di sini.
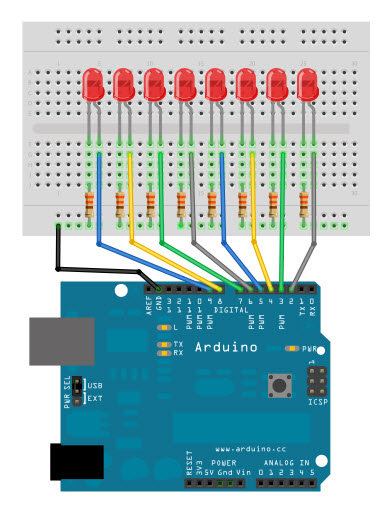
Multiple LEDs using Arduino
Kode Pemrograman
Di bawah ini adalah kode pemrograman yang digunakan untuk Multiple LED.
[cc lang="c" escaped="true"]//LED Pin Variables
int ledPins[] = {2,3,4,5,6,7,8,9}; //An array to hold the pin each LED is connected to
                                   //i.e. LED #0 is connected to pin 2, LED #1, 3 and so on
                                   //to address an array use ledPins[0] this would equal 2
                                   //and ledPins[7] would equal 9

/*
 * setup() - this function runs once when you turn your Arduino on
 * We the three control pins to outputs
 */
void setup()
{

  //Set each pin connected to an LED to output mode (pulling high (on) or low (off)
  for(int i = 0; i < 8; i++){         //this is a loop and will repeat eight times
      pinMode(ledPins[i],OUTPUT); //we use this to set each LED pin to output
  }                                   //the code this replaces is below

  /* (commented code will not run)
   * these are the lines replaced by the for loop above they do exactly the
   * same thing the one above just uses less typing
  pinMode(ledPins[0],OUTPUT);
  pinMode(ledPins[1],OUTPUT);
  pinMode(ledPins[2],OUTPUT);
  pinMode(ledPins[3],OUTPUT);
  pinMode(ledPins[4],OUTPUT);
  pinMode(ledPins[5],OUTPUT);
  pinMode(ledPins[6],OUTPUT);
  pinMode(ledPins[7],OUTPUT);
  (end of commented code)*/
}

/*
 * loop() - this function will start after setup finishes and then repeat
 * we call a function called oneAfterAnother(). if you would like a different behaviour
 * uncomment (delete the two slashes) one of the other lines
 */
void loop()                     // run over and over again
{
  oneAfterAnotherNoLoop();   //this will turn on each LED one by one then turn each off
  //oneAfterAnotherLoop();   //does the same as oneAfterAnotherNoLoop but with
                             //much less typing
  //oneOnAtATime();          //this will turn one LED on then turn the next one
                             //on turning the
                             //former off (one LED will look like it is scrolling
                             //along the line
  //inAndOut();              //lights the two middle LEDs then moves them out then back
                             //in again
}

/*
 * oneAfterAnotherNoLoop() - Will light one LED then delay for delayTime then light
 * the next LED until all LEDs are on it will then turn them off one after another
 *
 * this does it without using a loop which makes for a lot of typing.
 * oneOnAtATimeLoop() does exactly the same thing with less typing
 */
void oneAfterAnotherNoLoop(){
  int delayTime = 100; //the time (in milliseconds) to pause between LEDs
                       //make smaller for quicker switching and larger for slower
  digitalWrite(ledPins[0], HIGH);  //Turns on LED #0 (connected to pin 2 )
  delay(delayTime);                //waits delayTime milliseconds
  digitalWrite(ledPins[1], HIGH);  //Turns on LED #1 (connected to pin 3 )
  delay(delayTime);                //waits delayTime milliseconds
  digitalWrite(ledPins[2], HIGH);  //Turns on LED #2 (connected to pin 4 )
  delay(delayTime);                //waits delayTime milliseconds
  digitalWrite(ledPins[3], HIGH);  //Turns on LED #3 (connected to pin 5 )
  delay(delayTime);                //waits delayTime milliseconds
  digitalWrite(ledPins[4], HIGH);  //Turns on LED #4 (connected to pin 6 )
  delay(delayTime);                //waits delayTime milliseconds
  digitalWrite(ledPins[5], HIGH);  //Turns on LED #5 (connected to pin 7 )
  delay(delayTime);                //waits delayTime milliseconds
  digitalWrite(ledPins[6], HIGH);  //Turns on LED #6 (connected to pin 8 )
  delay(delayTime);                //waits delayTime milliseconds
  digitalWrite(ledPins[7], HIGH);  //Turns on LED #7 (connected to pin 9 )
  delay(delayTime);                //waits delayTime milliseconds

//Turns Each LED Off
  digitalWrite(ledPins[7], LOW);  //Turns on LED #0 (connected to pin 2 )
  delay(delayTime);                //waits delayTime milliseconds
  digitalWrite(ledPins[6], LOW);  //Turns on LED #1 (connected to pin 3 )
  delay(delayTime);                //waits delayTime milliseconds
  digitalWrite(ledPins[5], LOW);  //Turns on LED #2 (connected to pin 4 )
  delay(delayTime);                //waits delayTime milliseconds
  digitalWrite(ledPins[4], LOW);  //Turns on LED #3 (connected to pin 5 )
  delay(delayTime);                //waits delayTime milliseconds
  digitalWrite(ledPins[3], LOW);  //Turns on LED #4 (connected to pin 6 )
  delay(delayTime);                //waits delayTime milliseconds
  digitalWrite(ledPins[2], LOW);  //Turns on LED #5 (connected to pin 7 )
  delay(delayTime);                //waits delayTime milliseconds
  digitalWrite(ledPins[1], LOW);  //Turns on LED #6 (connected to pin 8 )
  delay(delayTime);                //waits delayTime milliseconds
  digitalWrite(ledPins[0], LOW);  //Turns on LED #7 (connected to pin 9 )
  delay(delayTime);                //waits delayTime milliseconds
}

/*
 * oneAfterAnotherLoop() - Will light one LED then delay for delayTime then light
 * the next LED until all LEDs are on it will then turn them off one after another
 *
 * this does it using a loop which makes for a lot less typing.
 * than oneOnAtATimeNoLoop() does exactly the same thing with less typing
 */
void oneAfterAnotherLoop(){
  int delayTime = 100; //the time (in milliseconds) to pause between LEDs
                       //make smaller for quicker switching and larger for slower

//Turn Each LED on one after another
  for(int i = 0; i <= 7; i++){
    digitalWrite(ledPins[i], HIGH);  //Turns on LED #i each time this runs i
    delay(delayTime);                //gets one added to it so this will repeat
  }                                  //8 times the first time i will = 0 the final
                                     //time i will equal 7;

//Turn Each LED off one after another
  for(int i = 7; i >= 0; i--){  //same as above but rather than starting at 0 and counting up
                                //we start at seven and count down
    digitalWrite(ledPins[i], LOW);  //Turns off LED #i each time this runs i
    delay(delayTime);                //gets one subtracted from it so this will repeat
  }                                  //8 times the first time i will = 7 the final
                                     //time it will equal 0

}

/*
 * oneOnAtATime() - Will light one LED then the next turning off all the others
 */
void oneOnAtATime(){
  int delayTime = 100; //the time (in milliseconds) to pause between LEDs
                       //make smaller for quicker switching and larger for slower

  for(int i = 0; i <= 7; i++){
    int offLED = i - 1;  //Calculate which LED was turned on last time through
    if(i == 0) {         //for i = 1 to 7 this is i minus 1 (i.e. if i = 2 we will
      offLED = 7;        //turn on LED 2 and off LED 1)
    }                    //however if i = 0 we don't want to turn of led -1 (doesn't exist)
                         //instead we turn off LED 7, (looping around)
    digitalWrite(ledPins[i], HIGH);     //turn on LED #i
    digitalWrite(ledPins[offLED], LOW); //turn off the LED we turned on last time
    delay(delayTime);
  }
}

/*
 * inAndOut() - This will turn on the two middle LEDs then the next two out
 * making an in and out look
 */
void inAndOut(){
  int delayTime = 100; //the time (in milliseconds) to pause between LEDs
                       //make smaller for quicker switching and larger for slower

  //runs the LEDs out from the middle
  for(int i = 0; i <= 3; i++){
    int offLED = i - 1;  //Calculate which LED was turned on last time through
    if(i == 0) {         //for i = 1 to 7 this is i minus 1 (i.e. if i = 2 we will
      offLED = 3;        //turn on LED 2 and off LED 1)
    }                    //however if i = 0 we don't want to turn of led -1 (doesn't exist)
                         //instead we turn off LED 7, (looping around)
    int onLED1 = 3 - i;       //this is the first LED to go on ie. LED #3 when i = 0 and LED
                             //#0 when i = 3
    int onLED2 = 4 + i;       //this is the first LED to go on ie. LED #4 when i = 0 and LED
                             //#7 when i = 3
    int offLED1 = 3 - offLED; //turns off the LED we turned on last time
    int offLED2 = 4 + offLED; //turns off the LED we turned on last time

    digitalWrite(ledPins[onLED1], HIGH);
    digitalWrite(ledPins[onLED2], HIGH);
    digitalWrite(ledPins[offLED1], LOW);
    digitalWrite(ledPins[offLED2], LOW);
    delay(delayTime);
  }

  //runs the LEDs into the middle
  for(int i = 3; i >= 0; i--){
    int offLED = i + 1;  //Calculate which LED was turned on last time through
    if(i == 3) {         //for i = 1 to 7 this is i minus 1 (i.e. if i = 2 we will
      offLED = 0;        //turn on LED 2 and off LED 1)
    }                    //however if i = 0 we don't want to turn of led -1 (doesn't exist)
                         //instead we turn off LED 7, (looping around)
    int onLED1 = 3 - i;       //this is the first LED to go on ie. LED #3 when i = 0 and LED
                             //#0 when i = 3
    int onLED2 = 4 + i;       //this is the first LED to go on ie. LED #4 when i = 0 and LED
                             //#7 when i = 3
    int offLED1 = 3 - offLED; //turns off the LED we turned on last time
    int offLED2 = 4 + offLED; //turns off the LED we turned on last time

    digitalWrite(ledPins[onLED1], HIGH);
    digitalWrite(ledPins[onLED2], HIGH);
    digitalWrite(ledPins[offLED1], LOW);
    digitalWrite(ledPins[offLED2], LOW);
    delay(delayTime);
  }
}[/cc]
Melakukan Perubahan
- Menggunakan loop
Perhatikan kode pada baris void loop(), di dalamnya terdapat 4 baris kode. 3 baris kode dimulai dengan karakter //. Ini artinya baris kode tersebut dianggap sebagai komentar (comment) dan tidak akan dijalakan oleh program. Untuk merubah program agar menjalankan baris kedua, rubah kode program menjadi seperti berikut ini:
[cc lang="c" escaped="true" first_line="38"]void loop()                     // run over and over again
{
  //oneAfterAnotherNoLoop();   //this will turn on each LED one by one then turn each off
  oneAfterAnotherLoop();   //does the same as oneAfterAnotherNoLoop but with
                             //much less typing
  //oneOnAtATime();          //this will turn one LED on then turn the next one
                             //on turning the
                             //former off (one LED will look like it is scrolling
                             //along the line
  //inAndOut();              //lights the two middle LEDs then moves them out then back
                             //in again
}[/cc]
Upload program-nya dan perhatikan bahwa tidak terdapat perubahan. Kalau anda perhatikan kedua fungsi tersebut, masing-masing melakukan hal yang sama, tetapi dengan pendekatan yang berbeda (fungsi kedua menggunakan loop).
- Animasi yang lain
Bosan dengan animasi yang sekarang sedang berjalan? Cobalah 2 contoh animasi yang lain. Hilangkan // pada baris fungsi yang ke 3, kemudian upload program-nya. Maka animasi LED yang berbeda akan kita lihat. Ulangi hal yang sama pada baris ke 4.
- Buat animasi sendiri
Masukkan perubahan sesuai imaginasi anda untuk mendapatkan kreasi animasi anda sendiri. Hal utama yang perlu diperhatikan adalah menghidupkan LED dengan kode digitalWrite(pinNumber, HIGH); dan mematikan LED dengan kode digitalWrite(pinNumber, LOW);.
Jangan khawatir, pengetikkan kode program yang salah tidak akan mengakibatkan kerusakan.
Selamat mencoba dan berkreasi!

Siang mas zefrani. Saya mau tanya, ada referensi code yang menggunakan metode multitasking tidak ? Terimakasih